

GnuPG 是目前广泛使用的加密软件,在棱镜门事件中它已经被检验了安全性。
所需软件
Windows:安装 Gpg4Win
Linux:通过包管理安装 gpg
生成密钥
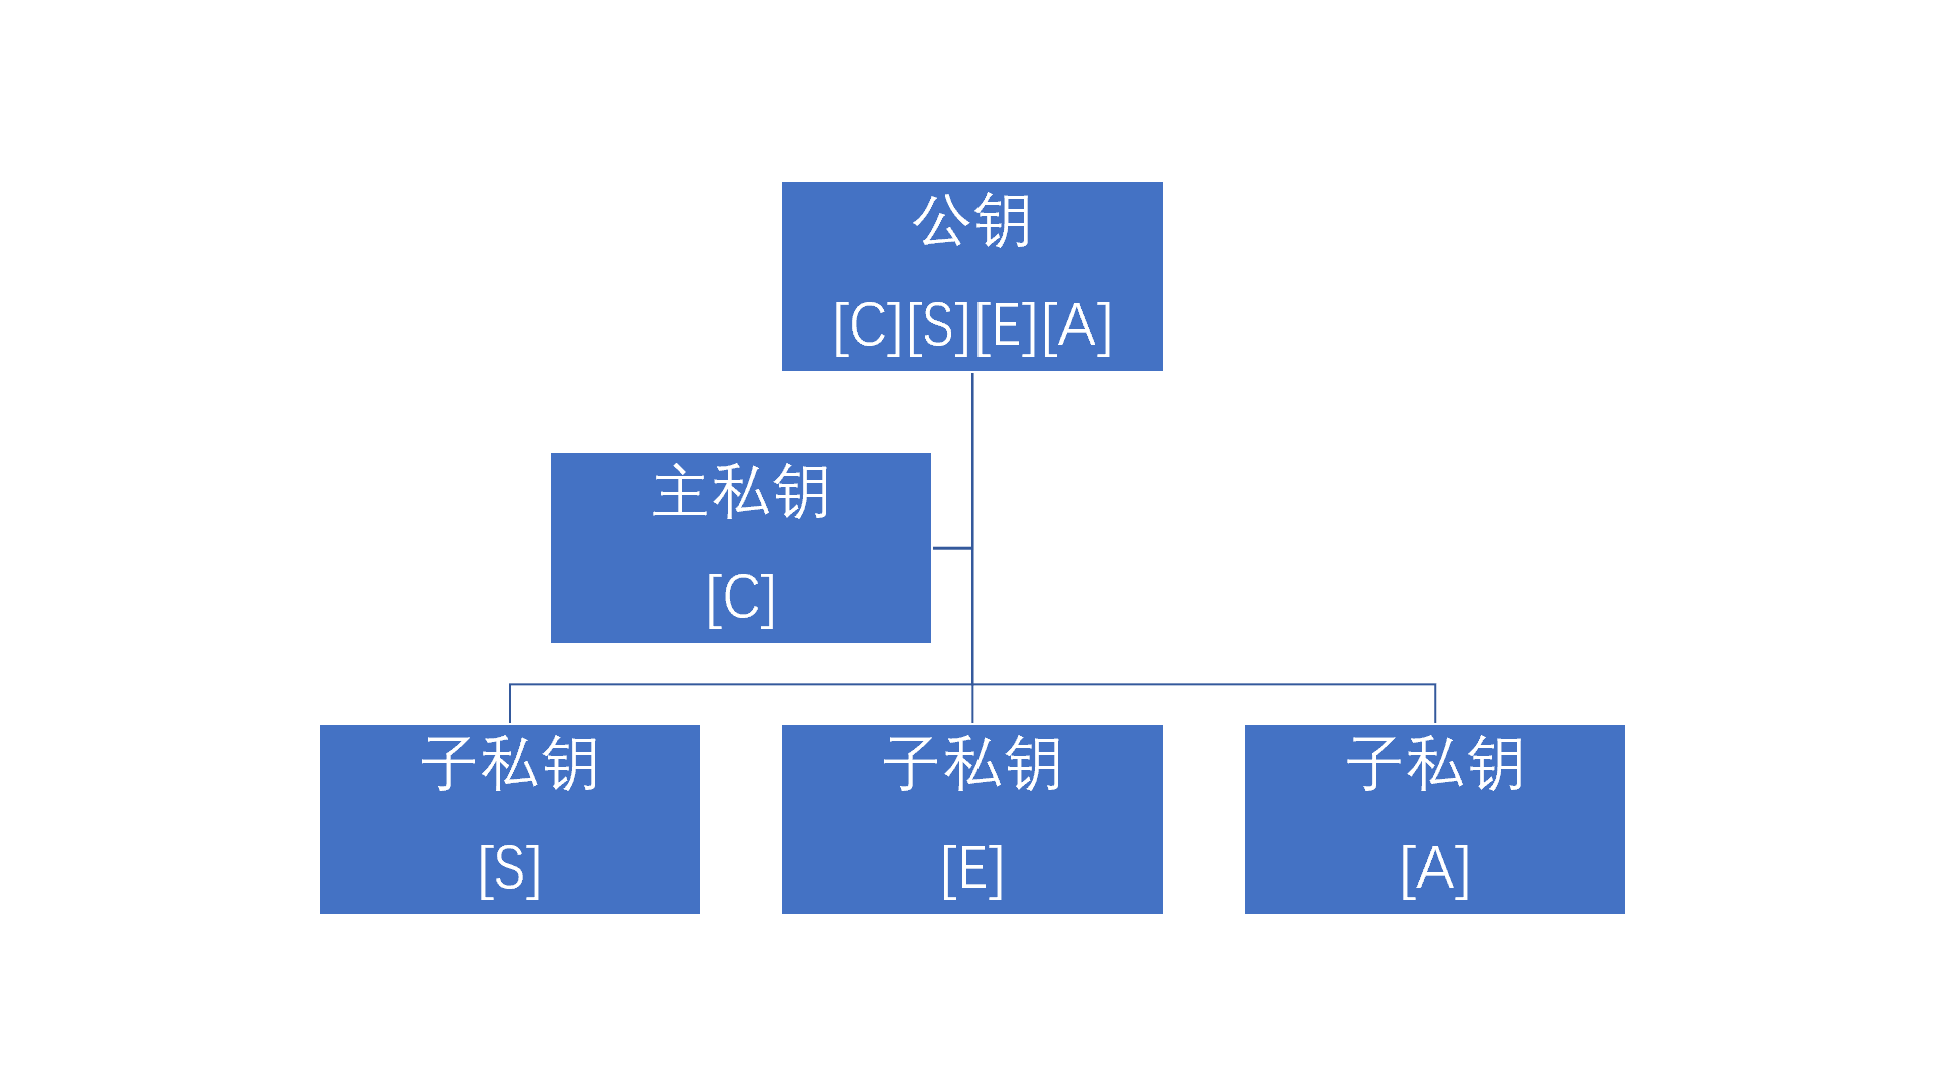
GnuPG 的密钥机制
在 GPG 中,私钥分为主私钥和子私钥。私钥有 4 个功能,分别是:
- [C] Certifitating 认证,用于签发子密钥
- [S] Signing 签名
- [E] Encrypting 加密
- [A] Authenticating 身份验证
其中,[C] 功能只有主私钥才有,并且主私钥一定具备 [C] 功能。
一把私钥可以有多个功能,由其使用的算法决定是否支持。主密钥和子密钥的算法可以不一样。
这是什么意思呢?RSA 算法的私钥支持 C,S,E,A 四个功能,也就是说 RSA 算法的主私钥除了 C 功能外还可以同时拥有其它三个功能任意一到三种的组合,RSA 算法的子私钥可以拥有 S,E,A 三个功能中的任意一到三种的组合,如果你愿意的话可以生成一把全功能的 RSA 主密钥,不另外添加子密钥。而对于 ECC 中的 25519 曲线有两种实现, ed25519 支持 C,S,A 三个功能但不支持 E (加密)功能,对于加密则使用 cv25519,而 cv25519 的密钥也支持加密这一个功能。
每一把私钥都有其对应的公钥,而 GnuPG 中的公钥实际上是主私钥和所有子私钥对应公钥的合集。修改私钥信息需要有主密钥,并且修改了私钥信息后公钥也会变化。
公钥和私钥在数学上是等价的,只是 GnuPG 为了方便实际使用划分了公私钥,它们有不同的分工:
- 用公钥加密,对应私钥解密
- 用私钥签名,对应公钥验证
- 身份验证功能就像 ssh 的密钥登陆一样,gpg 私钥对应 ssh 密钥
A 和 B 交换了自己的公钥,A 使用自己的私钥签名,使用 B 的公钥进行加密操作,B 收到后使用 A 的公钥验证签名,使用自己的私钥进行解密操作,这样双方不需要分享私钥就能完成加密通讯,第三方攻击者没有私钥就不能伪造 A,B 的签名,拿到加密内容也无法解密。这就是非对称加密
为了便于管理,我们这样设计密钥:生成仅具有 C 功能的主私钥,然后用主私钥分别签发三把其它三个功能的子私钥,每把子密钥只具有一个功能。
生成主密钥
打开终端(windows 下用 powershell),执行 gpg --expert --full-gen-key来生成新的主密钥。这里我们使用了 --expert 参数来允许调整更多设置。
1 | gpg (GnuPG) 2.2.28; Copyright (C) 2021 g10 Code GmbH |
选择主密钥的算法。ECC 中的 25519 曲线是比较好的选择,也可以选择 RSA 算法,但是 RSA 算法一定要 2048 位以上才足够安全。这里以 ECC 算法为例。
由于我们需要自定义主密钥的功能,选择 11
1 | Possible actions for a ECDSA/EdDSA key: Sign Certify Authenticate |
然后选择主密钥的功能,默认会加上 S 功能,输入 s 来把它去掉
1 | Possible actions for a ECDSA/EdDSA key: Sign Certify Authenticate |
然后输入 q 结束设定
1 | Please select which elliptic curve you want: |
选择使用的椭圆曲线,强烈建议用 25519 曲线,它是目前最快的椭圆曲线加密算法,能提供相当于 RSA 3072 的加密级别。而 NIST 椭圆曲线算法有来历不明的参数,被质疑是 NIST(美国国家标准与技术研究院) 故意留下的弱化实现。
1 | Please specify how long the key should be valid. |
选择密钥过期时间。在密钥能安全保存的情况下,可以选择永不过期。
然后确认设置,之后按提示输入身份信息。GPG 通过 User ID 来区分密钥,User ID 由 Name, Email, Comment 三要素组成,至少要有其中一项。
确认信息后生成密钥,强烈建议给私钥设置密码。
生成子密钥
输入 gpg --expert --edit-key 用户ID 来编辑刚刚生成的密钥。用户 ID 就是名字、邮箱、注释的其中一项。同样的,这次也使用 --expert 参数来调整更多设置。
输入 addkey 来添加子密钥:
1 | Please select what kind of key you want: |
选择 10 来添加使用 ECC 算法的具有 sign 功能的子密钥
1 | Please select which elliptic curve you want: |
依然选择 25519 曲线。
之后输入过期时间,确认信息后生成。
输入 addkey 后选择 12 来添加 ECC 算法的加密子密钥,仍然用 25519 曲线。
最后生成 A 功能的子密钥,输入 addkey 后选择 11:
1 | Possible actions for a ECDSA/EdDSA key: Sign Authenticate |
把 S 功能去掉,加上 A 功能,按之前的流程生成密钥。
到此子密钥就生成好了,输入 quit 保存退出
备份
导出所有私钥
gpg -a --export-secret-key 用户ID > secret-key
这里使用了输出重定向将原本要显示在屏幕上的内容保存在了文件中,导出私钥会要求输入密码,-a 参数表示导出为 ascii 编码的文本(默认是二进制格式)
secret-key 包含了主私钥和所有子私钥
导出子私钥
gpg -a --export-secret-subkeys 用户ID > secret-subkeys
secret-subkeys 包含了所有子私钥,但不包含主私钥
导出撤销证书
如果私钥发生了泄漏,或者因为其它原因不应该继续使用这个密钥,需要用到撤销证书来让密钥失效
gpg -a --gen-revoke 用户ID > revoke-cert
会要求输入撤销密钥的原因
1 | Create a revocation certificate for this key? (y/N) y |
撤销证书同样要安全保存
导出公钥
公钥本身就是用来公开的,不需要考虑安全,导出的私钥里是包含公钥的,这里导出一份公钥是为了方便使用。
gpg -a --export 用户ID > public-key
上传到 keyserver
keyserver 是用来存储公钥的服务器,将公钥发布到 keyserver 后任何人都可以下载。
keyserver 有很多,这里以 keys.openpgp.org 为例
执行 gpg --export [email protected] | curl -T - https://keys.openpgp.org 来上传公钥
如果添加了邮箱信息,会返回一个邮箱验证的链接,在两小时内激活可以将邮箱绑定到公钥,之后可以在网页上通过邮箱搜索到公钥,并能够管理公钥。如果不验证邮箱,只能用 key id 搜索公钥。
key id 可通过 gpg --fingerprint 查询,pub 下的一串 40 位的代码就是 key id。
也可以去网页上手动上传公钥文件。
离线备份主私钥
考虑到主私钥非常重要而又很少使用,建议把主私钥删除
gpg --delete-secret-and-public-key 用户ID
会同时删除公钥和私钥
之后输入 gpg --import secret-subkeys 导入所有子私钥
由于这次是重新导入密钥,需要重新对密钥进行信任。输入 gpg --edit-key 用户ID 编辑 key,然后输入 trust 设置信任:
1 | Please decide how far you trust this user to correctly verify other users' keys |
这里选择 5 :无限信任,设置完了需要 quit 保存退出后生效。
输入 gpg -K 查看密钥,会发现主私钥字段 sec 后面多了一个 #,代表主私钥缺失,这样就成功移除了主私钥。
在不使用主私钥功能、不对密钥进行修改的时候是不需要主私钥的。
如何保存私钥
一个比较好的方法是使用加密 u 盘。windows 可保存到使用 bitlocker 加密的 u 盘上,linux 可使用 crpytsetup 创建 LUKS 加密盘。
GPG 的使用
文件加解密
gpg --recipient 用户ID --output 输出文件 --encrypt 要加密的文件
--recipient 参数指定接收者,将会用接收者的公钥加密文件。
解密操作:
gpg --decrypt 要解密的文件 --output 输出文件
如果密钥已经移动到智能卡,会提示插入智能卡并要求输入 PIN
文件签名
gpg --clearsign 要签名的文本文件
为什么是文本文件呢?因为 –clearsign 参数是以 ascii 编码生成签名后的文件,其实就是在文件末尾追加一段签名内容。
当然,对二进制文件来说这样签名会损坏文件,因此需要生成单独的签名文件
gpg --detach-sign 要签名的文件
将会单独生成一个 sig 格式的签名文件,它是二进制的,如果想要生成 ascii 编码的签名文件,加上 -a 参数:
gpg -a --detach-sign 要签名的文件
文件签名+加密
gpg -a --local-user 用于签名的用户ID --recipient 文件接收者用户ID --sign --encrypt 要签名和加密的文件
将会用 –local-user 指定的用户的私钥进行签名,–recipient 指定的用户的公钥进行加密。
(只适用于文本文件,二进制文件需要单独生成签名文件)
验证签名
gpg --verify 签名文件 被签名的文件
导入撤销证书
执行 gpg --import 撤销证书,然后重新发布公钥
用于 git commit 签名
输入 gpg --list-secret-keys --keyid-format=long 查看 key id
1 | sec# ed25519/XXXXXXXXXXXXXX 2021-12-20 [C] |
sec 主密钥一行,加密方式(这里是ed25519)后面的一串代码就是 key id,然后输入 git config --global user.signingkey KEY_ID 告诉 git 使用这个 id 的密钥来签名。同时需要将 gpg 公钥添加到 github
之后 git commit 时加上参数 -S 就会调用 gpg 对 commit 进行签名
如果想默认使用 gpg 进行签名,可以执行 git config --global commit.gpgsign true,这样在 commit 时就不用加参数了。
OpenPGP 智能卡
虽然 GPG 能给个人带来足够的安全,但是由于非对称加密算法的特点,它带来的一切安全都是建立在私钥安全的基础上的。为了更好保护私钥,一个比较好的选择是使用 OpenPGP 智能卡。
Yubikey 是目前容易买到的智能卡,注意不是所有型号都支持 PGP 智能卡功能,它们支持密钥格式也有差异,买之前要注意。
OpenPGP 智能卡有 3 个密钥槽,分别是:
- Signature key
- Encryption key
- Authentication key
每个槽可存放对应功能的私钥。
设置智能卡
在 Linux 上,为了使用智能卡需要安装 scdaemon
打开终端,输入 gpg --card-status,应该可以检测到智能卡的信息。
如果检测不到,拔出 Key 再插入试试,Linux 下需要确保 scdaemon 在运行才能检测到智能卡。
智能卡被成功识别之后,输入 gpg --edit-card 进入卡管理控制台,然后输入 admin 切换到管理员模式。
修改 PIN
输入 passwd,GPG 会询问修改哪个 PIN
1 | gpg/card> passwd |
选择 1 修改 PIN,默认的 PIN 是 123456。
然后选择 3 修改 Admin PIN,默认的 Admin PIN 是 12345678。
修改完了之后选择 q 退出,然后输入 quit 退出 gpg。
转移密钥到智能卡
OpenPGP 智能卡自己可以生成密钥,但是在卡上生成的密钥无法取出,不能进行备份,所以不建议直接在卡上生成密钥,而是在电脑上生成密钥备份好后转移到智能卡中。
转移密钥到智能卡会将本地保存的密钥删除,智能卡中的密钥将无法取出,在继续之前请确保已经备份了密钥!
需要智能卡支持要转移的密钥使用的算法!
Canokey Pigeon,Yubikey 5 固件版本在 5.2.3 之后的产品支持 ed25519,RSA 支持到 4096 位,Yubikey 4 不支持 ed25519,RSA 支持到 4096 位,飞天 K9+ 不支持 ed25519,RSA 支持到 2048 位。详细的算法支持信息请查阅生产厂家提供的资料
输入 gpg --expert --edit-key 用户ID 编辑密钥
然后输入 key 1 选中第一个子密钥,之后输入 keytocard 移动这个子密钥到智能卡,选择功能对应的槽位,之后会要求提供私钥密码,智能卡 Admin PIN。初次移动时要输入两次 Admin PIN。
完成之后,输入 key 1 取消选中,然后输入 key 2 选中第二个子密钥继续进行 keytocard 操作,以此类推,将 3 个子密钥移动到卡中。
如果不选中子密钥直接执行 keytocard,会移动主私钥到卡中(不建议这样做)
quit 保存退出,之后输入 gpg -K查看密钥,如果子私钥标识 sub 后有箭头 > 说明移动成功了,此时电脑上已经没有子私钥文件了,替代的是一个指向智能卡的指针。
设置公钥 URL
受限于存储空间,OpenPGP 智能卡虽然不能保存公钥,但是可以存储一个公钥的 URL,在其它电脑上使用时,可以让 gpg 通过 url 获取公钥,然后就能使用智能卡了。
要这么做,需要先将公钥上传到网站或者网盘之类的地方以获取永久的下载外链
输入 gpg --edit-card 进入智能卡编辑模式,然后输入 admin 启用管理员命令
输入 url 来设置公钥地址,会要求 Admin PIN。
在其它电脑上使用智能卡,只需要将 key 插入,然后 gpg --edit-card,输入 fetch 获取公钥,gpg 将自动下载和导入公钥,并将私钥指向智能卡。
交换密钥
我的公钥:
1D20 9F54 50DA 6A84
已上传 openpgp keyserver
uid:
Name: creamlike1024
Email: creamlike1024@outlook.com
自从密钥创建以来还没玩过(~ ̄▽ ̄)~